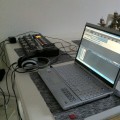
If you do most of your playing at home and don’t have a band (my band is currently just two guitarists jamming on Sundays for instance, on break for the summer at that) but still want to make songs, you are going to be using virtual drums. You should consider yourself lucky, because nowadays there are professional sounding plugins like Superior Drummer that are actually used in real productions. 15 years ago you would have had to make do with a crappy drum machine.
When I first started writing my own songs I used EZDrummer Drumkit from Hell. It’s a very competent plugin at a really reasonable price. One of its best features is the included grooves library. You have instant access to grooves recorded by Toontrack’s awesome drummers that you can just drag and drop into your DAW. They are well categorized (“Double bass, back beat, crash/bell, groove 5”) and since they are MIDI they automatically adapt to your song’s bpm and you can make adjustments to them in a standard MIDI editor.
If you’re anything like me though, you’re going to want to do your own drum patterns. Custom drum patterns tailored to your guitar riffs are going to enforce the rhythm and can add a whole new “drive”. They can also create the illusion that you’re playing faster and tighter (hide small timing slipups), where generic patterns can cause the opposite.
Getting Started
When programming drums I already have my guitar tracks made. I’ve usually tracked those to a prefabricated groove or (less common) a metronome.
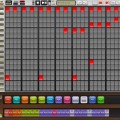
I always program the drum patterns in a MIDI editor. Some people like to record the MIDI notes live using a keyboard or pads, but I’m just not good enough to do that. Too many different parts of the kit needs to be played at once and I never get it tight. The only time I use pads and record “live” is when I can’t nail the groove I want by programming just to see approximately where in the grid specific hits belong (it can get hairy sometimes with triplets, 1/24 resolution etc).
To make the programming easier, get a drum map. It’s a text file that you load into your DAW that maps generic MIDI notes like D#3 to their equivalents in the drum VST, like “Crash 5 bell”. For simple patterns you can use a generic MIDI drum map, but to really utilize your drum VST get a specific map. Here’s a Superior Drummer 2 map for Reaper.
Add a new (MIDI) track to the project in your DAW for the drums and apply your favorite drum plugin. Add a new empty MIDI item with the same length as your rhythm guitar “cycle” for this part (not sure what to call it, one complete play of the current rhythm riff). I usually start with snare, just adding hits every other bar.
With the snare as a sort of metronome I add kick. If there’s distinct alt picked pedaling in the riff I often let the kicks (double, of course!) follow that for emphasis.
Next cymbals and hats. The overhead mics in Superior Drummer simulate stereo recording, so depending on which crash you choose for a particular hit it will be panned a bit to either side. So alternate between cymbals for a more full sound from the drumkit. Also, if your pattern uses a lot of hats those are usually on the left, so go with more crashes on the right in that pattern. Kicks and snares are dead center.
How to Make it Real
There’s a good chance your first drum patterns will sound a bit stale and mechanic. Especially fast snare fills are susceptible to the “machine gun effect” making them sound nothing like nothing like a real drummer.
The answer is dynamics. A drummer I know once told me “music without dynamics is just boring”. There are two ways of making your drum patterns more dynamic and thereby more human: velocity and timing.
Velocity is the MIDI term for how hard a note is hit, regardless of instrument. Each note has a velocity between 0 (no hit) and 127 (maximum force). You may think this is the same as volume, but its not. The difference is that good instrument simulators change the sound with velocity, not just the volume. For a piano a lower velocity may mean less attack, in Superior Drummer a different velocity means a different recorded drum sample is used.
No drummer hits perfectly hard dead center every time, but that’s what it sounds like when you have all your hits at velocity 127. If you just vary the velocities a little bit that machine gun snare fill will sound much more like a cool fast recorded drummer. It’s also nice to have the virtual drummer play softer in a part and then hammer away like crazy in the next one, for dramatic effect.
For cymbals I take all hits down a bit, not just for variation but since I think they are a bit to piercing in the mix on the default settings. Some people like to decrease the volume on the overhead mics instead. That also removes a bit of the subtle room reverb that comes from the overheads making the drums drier and more suited for extremer and more technical metal. I’m a little more rock’n’roll in my approach to metal so I like to keep a bit of the room from the overheads and lower the velocity on cymbals. The only exceptions is bells which are pretty wimpy in most kits, I use higher velocity on those than on other cymbal hits.
The second parameter you can change for increased dynamics is timing. Again, no real drummer is spot on 100% of the time. Small imperfections in timing can make the drums much less mechanical. You have to be careful though, if the timing is off by just a little too much it will sound sloppy or even outright weird.
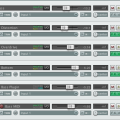
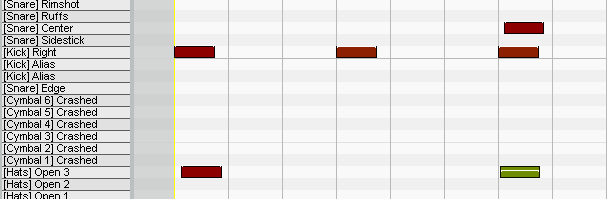
If you look at some of the patterns shipped with EZdrummer you can see the differences in timing, in the fill below for instance the snare hits are slightly off time compared to the kicks. You can also see the lowered velocity on the hihat when hit simultaneously with the kick and snare.
Most DAWs have built in tools for introducing variations in velocity and timing. In Reaper it’s called humanize and is available in the MIDI editor. Be careful when applying it, it moves around the notes in your patterns so save a backup of you original patterns on a separate muted track.
Finishing Up
Once the patterns for all the parts are done I start to differentiate repeated patterns. Mostly this means adding fills of different kinds. This is part of the embellishment phase I was talking about in my third post about creating songs. Variate tom fills with kick/snare fills. Also try to make the last fill of a pattern lead into the next – if it’s a slow part followed by a faster, make the fill a fast one. If the next part is heavy, make the fill slower and dramatic with heavier hits.
And then of course, lastly you need to match the overall volume levels with the rest of the song. Good luck!